I recommend looking at this first: http://boredhackerblog.blogspot.com/2016/12/setting-up-pentesting-lab-for-school.html
Introduction:
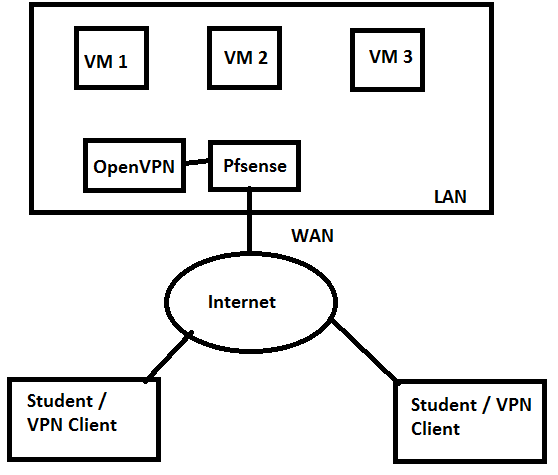
In this post, I’ll be focusing on setting up a pentesting lab that allows students to VPN in and attack virtual machines. I will be using ESXi, Pfsense, and OpenVPN. You are not limited to using ESXi, pfsense, and OpenVPN. First time I set this up, I ended up using PPTP VPN instead. I don’t recommend using PPTP.
Goal was to allow students to remotely hack machines and improve their skills. It would be better if they could do attacks from home instead of them having to be at the school just to learn this.
ESXi:
If you’re not familiar with ESXi then imagine using Virtualbox or VMWare workstation but imagine having a dedicated host for just virtualization.
If you’re a university student, check to see if you can get a free license. Alternatively, you can use Proxmox VE: https://www.proxmox.com/en/proxmox-ve Proxmox supports VM’s and containers.
My specs for the server I’m running ESXi on:
8 CPUs x Intel(R) Xeon(R) CPU E5410 @ 2.33GHz (2 sockets * 4 cores/per socket)
32 GB RAM
700GB Storage
Networking:
This is what our overall setup will look like:
VPN Network will be 10.0.8.0/24
LAN Network (with our vulnerable VM’s) will be 192.168.1.0/24
Students will connect to WAN IP address, which will have Pfsense port forwarding VPN port to OpenVPN box. I realize that I can run OpenVPN server on Pfsense, but for me it was easier to setup OpenVPN server on Ubuntu using a script that I found.
ESXi Networking:
You will at least have 2 networks. One will be attached to an interface, one will not be attached to an interface.
Network that’s attached to an interface is your WAN. Network that’s not is your LAN.
You can create more networks, especially if you want people to learn tunneling and pivoting.
To set up WAN, login to ESXi with vSphere Client or Web Client. Go to Configuration, then Networking.
Click “Add Networking…” on the top right corner. You should see something similar to this:
Leave Virtual Machine option selected, then click Next.
You should see a prompt similar to one shown below:
Select the vSwitch that is connected to your WAN network / the network you want to have your OpenVPN server running on. Click Next.
Configure Network Label and VLAN ID (VLAN ID is optional). My Network Label is “Attacker_IN.” Click Next.
You should see your network configuration preview. If it looks good, click Finish.
Now we’ll create LAN / network for our vulnerable VM’s.
You will click “Add Networking…” again, click Next. Instead of selecting an option to use a vSwitch, we will select “Create vSphere standard switch” as shown in the screenshot below.
Click Next, then add your Network Label. I used “Vuln1” for my setup. Click Next again.
Your preview should look similar to the screenshot below:
Click Finish to create the vSwitch.
Our Pfsense firewall will be on both vuln1 network and Attacker_IN. This will allow people from WAN to connect in and access vuln1 network.
Pfsense:
Now that we have our network configured, we can configure pfsense. Pfsense is a firewall/router. You can download pfsense here: https://pfsense.org/ You can use another alternative as well. You should upload the ISO to your datastore.
You need to create a virtual machine. You should have similar configuration to the screenshot below:
Make sure your CD/DVD drive is connected at the start up so you can boot from it and install pfsense.
Do the default installation. Pfsense should automatically recognize your WAN and your LAN. If you have DHCP, then it should get an IP address, alternatively, you can always go in and change it to static.
Management:
You can manage Pfsense via webUI. I highly recommend downloading Kali ISO and creating a virtual machine on Vuln1/LAN network. If you went with the default settings, than pfsense will have IP address of 192.168.1.1. The default username is admin and the password is pfsense.
Visit the IP address via your browser and finish up the configuration and change your password.
The management machine should normally be turned off, unless you need to use it to configure pfsense. You also can configure pfsense via command line.
OpenVPN Server:
After I have Ubuntu server installed, I will be installing OpenVPN on it using the script here: https://github.com/Angristan/OpenVPN-install We will also be able to manage OpenVPN users using that script. (fyi, always be careful when using scripts written by other people…, don’t just git clone and run random shit. I’ve made this mistake before.)
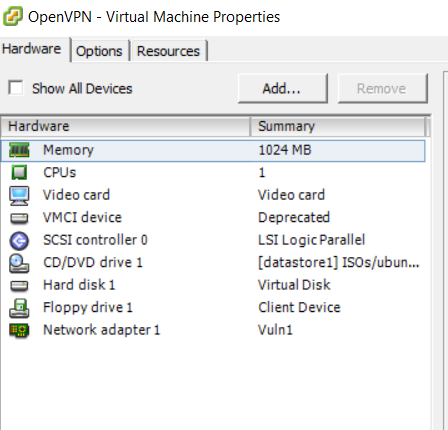
Your VM configuration should look similar to the screenshot:
You will need to adjust your RAM and CPU based on how many users you have. This is the first time I’m setting this up, so I don’t know if my RAM and CPU settings will work perfectly or not.
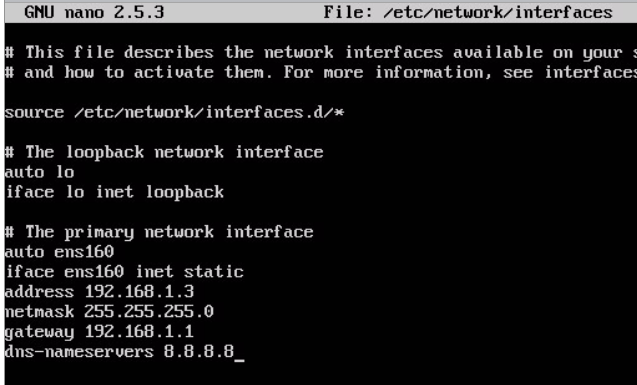
After Ubuntu server is installed, you will need to give it a static IP address.
Edit /etc/network/interfaces to look similar to this:
Reboot the system and confirm that IP address is correct.
Now we can set up OpenVPN service.
Run the following commands (obtained from project github page):
wget https://raw.githubusercontent.com/Angristan/OpenVPN-install/master/openvpn-install.sh
chmod +x openvpn-install.sh
Run the script as root.
You can go with all of the default recommended settings. I decided to select the fastest algorithms.
Since our OpenVPN server is running being NAT, you will see this prompt:
Enter your WAN IP address here. Later on, we’ll set up port forwarding from pfsense to OpenVPN.
After you’re done entering the IP address, it should have generated client.ovpn file for you. This file is given to your client. We’re gonna use this for testing, then add additional users. Additional users will have their own .ovpn files.
You will also need to install openssh-server (apt-get install openssh-server). This will allow you to SSH in, in order to add or retrieve files.
We’ll modify our Pfsense settings now. Start up your management VM and login to pfsense webUI.
Click Firewall, then NAT, and that will get you to port forwarding page. Add a new rule.
It should look similar to this:
I changed the Protocol to UDP. I changed Destination port range to OpenVPN. I also changed Redirect target IP to our OpenVPN server. Redirect target port is also changed to OpenVPN. Add and apply the rule.
Please add another rule for port 22/SSH, so we can remotely SSH into our OpenVPN machine in order to retrieve .ovpn files. If you clone the old rule, change the protocol to TCP. I wasted like 10 fucking minutes trying to figure out why I couldn’t connect to the SSH server.
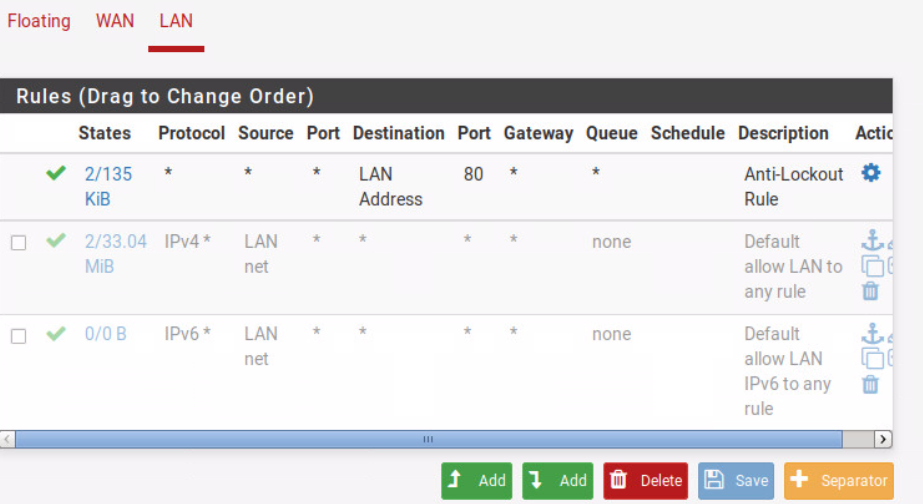
You will also need to go to Firewall / Rules / LAN. You will two rules for allowing traffic out.
We will be disabling those. You can do this by clicking the green check marks next to the rules. Click Apply after doing that. You should see the following after that:
All of the outgoing traffic will now be disabled.
The reason for this is, we don’t want students to VPN in, then visit other websites and use the lab as a proxy.
Try pinging 8.8.8.8 to confirm that outgoing traffic has been disabled.
Now we can remotely SSH into our OpenVPN server, retrieve .ovpn file, then test our connection.
After you have openvpn installed, you can connect to VPN server by running: openvpn --config client.ovpn
After you’re connected, ping/curl some of the machines to make sure everything is working. Try going out to the internet and make sure you can’t.
If everything seems to be working, then we’re done with our connection infrastructure.
Now we have to create more .ovpn files for our clients and set up vulnerable machines, then we’re done.
To create more .ovpn files, just re-run the openvpn-install.sh again, as root.
You will see a menu, as shown below. Enter 1, give a meaningful client name (This will be in the logs) and press enter. The script will create .ovpn file.
You can also remove clients with the script.
Now you can share .ovpn files with your students and have them use your pentest lab. If you care about logging, then add a client for each student.
Now you can set up vulnerable virtual machines. All of the vulnerable virtual machines will be put on vuln1 network.
Vulnerable VM's:
There are some of the vulnerable VM’s I had when I first built the lab (ignoring management and pfsense):
I generally prefer vulnerable ISO’s, since I don’t have to take VM snapshot and I can just reboot if a student decides to do something to prevent other students from doing their attacks.
Here are links to some of the VM’s:
VulnHub and PentesterLab will be your best resources for premade VM’s. The downside is, students will be able to find solutions rather quickly. You can always make your own VM’s. In my screenshot, you’ll see XP and Win7.
Additional considerations:
I highly recommend taking snapshots of virtual machines that are not ISO based. If anything goes wrong, you can always revert back to known-good configuration. Another thing you can do, which I haven’t gotten to yet, is to use ESXi command line utility and write a script to power off, revert, and start the VM’s every couple of hours.
To have students keep track of how they’re doing. You can use something like CTFd (https://github.com/isislab/CTFd) and create questions with different points, based on different VM’s. if a student is able to pwn a VM, they can submit something like “pwned”. Of course they can submit that for all VM’s at the same time but it’s there for them to track their progress so whatever.
Letting students access:
When you want students to access the lab and when you’re providing them .ovpn files, you need to give them additional information about what they can and cannot do in the lab.
This is what I sent out last time I had the pentest lab working:
“You are allowed to attack the IPs in the following range(s): X.X.X.X - X.X.X.X
Do NOT attack: X.X.X.X
You CANNOT use the following attacks: IP or ARP Spoofing, DoS”
Since I was running my pentest lab as a side project and not for any teacher or class, I didn’t expect students to dedicate too much time to it but I did ask them for monthly writeups (either public them on blog or email me) on what they did on the lab.
Next time, I’ll cover setting up a VNC based lab.
If I made mistakes, if you have questions, or have more ideas then leave comments. Since school is about to start soon, I can’t guarantee I’ll respond. Hopefully this post was useful to someone.