Problem:
I am running some webapps that I need to demonstrate to other people without giving them my home IP address.
My setup:
I have a virtual machine running the webapps, behind NAT at home.
Requirements:
- I do not want to send my IP address to people I’m demonstrating the application to.
- I do not want to open a port then do port forwarding.
Solutions:
The three solutions I thought of are Reverse SSH tunneling, VPN, and tor hidden services.
I love tor hidden services and I do use it but I will not be covering that in this blog post. I do not want the people I’m demoing the project to go download Tor. I also don’t want to set up Tor socks proxy for them.
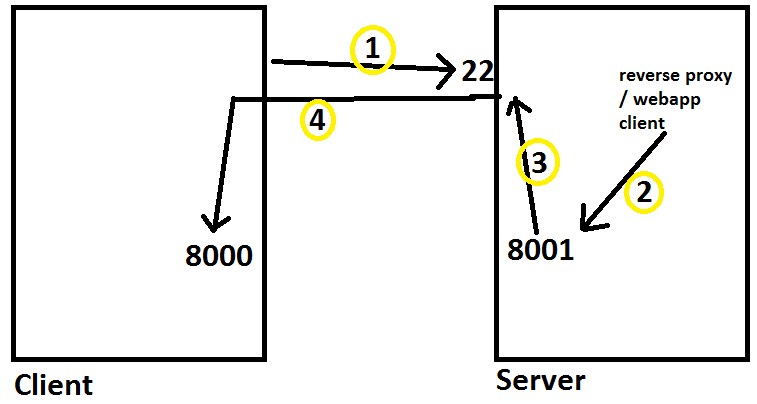
Reverse SSH solution:
CLIENT is behind a NAT with a webapp running on port 8000. SERVER (SSH server & reverse proxy server) has a public IP address that client can SSH into.
You can read more information about reverse SSH tunneling here: http://www.thegeekstuff.com/2013/11/reverse-ssh-tunnel and https://www.howtoforge.com/reverse-ssh-tunneling
Tools: Just an SSH server and a client.
Setup:
CLIENT:
ssh -R 8001:localhost:8000 user@SERVER
8001 is the port that’s opened on the SERVER
8000 is the port open on CLIENT, running a webapp
SERVER:
Server can now access localhost:8001 in order to access webapp on CLIENT, running on port 8000.
Note: You can also do the following:
ssh -R 8001:10.0.0.1:80 user@SERVER
In this case, when SERVER visits localhost:8001, the SERVER is able to access webapp running on 10.0.0.1:80 on the CLIENT network.
Diagram:
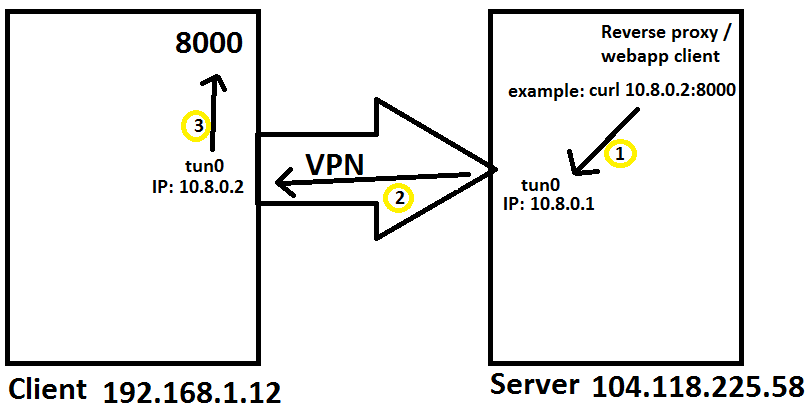
VPN solution:
In this solution, SERVER is an OpenVPN server and is running reverse proxy. CLIENT has a webapp running on port 8000.
In this case, the CLIENT will VPN into the SERVER. Reverse proxy running on the server will be able to access any ports open on the CLIENT.
Read more about VPN here: https://openvpn.net/index.php/open-source/documentation/howto.html and https://www.digitalocean.com/community/tutorials/how-to-set-up-an-openvpn-server-on-ubuntu-16-04
Tools:
OpenVPN 2.4 and OpenVPN-install script
Setup:
On CLIENT and SERVER, add OpenVPN repositories as described here: https://community.openvpn.net/openvpn/wiki/OpenvpnSoftwareRepos#UsingOpenVPNaptrepositories
I was using Ubuntu 14.04, so I ran the following commands on my SERVER and CLIENT:
sudo -s
wget -O - https://swupdate.openvpn.net/repos/repo-public.gpg|apt-key add -
echo "deb http://build.openvpn.net/debian/openvpn/release/2.4 trusty main" > /etc/apt/sources.list.d/openvpn-aptrepo.list
To install OpenVPN run the following commands:
apt-get update && apt-get install openvpn
We will now have openvpn on CLIENT and SERVER.
On the server, we will be using OpenVPN-install script from here: https://github.com/Angristan/OpenVPN-install
Simply following the steps here: https://github.com/Angristan/OpenVPN-install#usage
I ran the following on the server:
wget https://raw.githubusercontent.com/Angristan/OpenVPN-install/master/openvpn-install.sh
chmod +x openvpn-install.sh
./openvpn-install.sh
Please select whatever options meet your requirements.
At the end, you’ll have a client.ovpn file in ~/.
Transfer the file to your CLIENT machine.
I do not want CLIENT traffic to leave through SERVER. I did that by changing the OpenVPN server configuration file.
You will need to edit /etc/openvpn/server.conf
Comment out the following lines by adding # at the start of the line:
push "dhcp-option DNS X.X.X.X”
push "dhcp-option DNS X.X.X.X”
push "redirect-gateway def1 bypass-dhcp"
It should look like these afterwards:
#push "dhcp-option DNS X.X.X.X"
#push "dhcp-option DNS X.X.X.X"
#push "redirect-gateway def1 bypass-dhcp"
Run the following commands on the SERVER to make sure openVPN server is up and running:
service openvpn restart
service openvpn status
We need to change an iptables rule to allow traffic from SERVER to CLIENT.
If you run ‘iptables -t nat -L’, you’ll see the following:
SNAT all -- 10.8.0.0/24 anywhere to:YOUR_SERVER_IP
We will drop that rule. Dropping this rule will also disable CLIENT traffic to go through SERVER.
We can drop the rule with the following command:
iptables -t nat -D POSTROUTING -s 10.8.0.0/24 -j SNAT --to-source YOUR_SERVER_IP
You will also need to remove iptables command from /etc/rc.local afterwards.
Now, when CLIENT is VPN’ed into SERVER, it will use its own gateway for internet traffic instead of VPN server. SERVER will also be able to access any open ports on CLIENT.
On the client:
As root, run ‘openvpn --config client.ovpn’ to connect to SERVER. You can now set up the reverse proxy to allow SERVER to access CLIENT webapp.
Diagram:
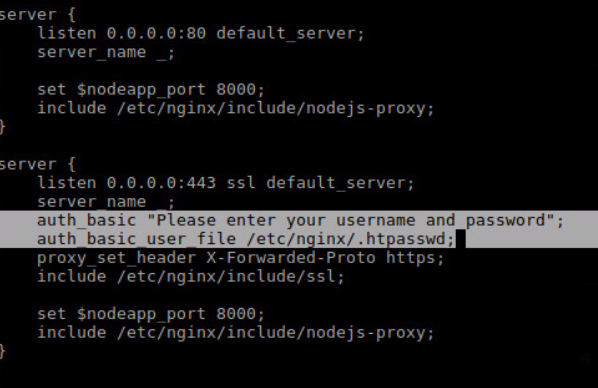
Reverse Proxy:
You can learn more about setting up reverse proxy here: https://www.nginx.com/resources/admin-guide/reverse-proxy/
(Just like the post here: http://boredhackerblog.blogspot.com/2016/12/setting-up-etherpad-with-basic-auth.html This post is for documenting solutions to my problems. Hope it helps out. Shout out to MSPaint. )