Thursday, May 25, 2017

Linux botnet malware analysis: part 3

Part 1: http://www.boredhackerblog.info/2017/05/linux-botnet-malware-analysis-part-1.html
Part 2: http://www.boredhackerblog.info/2017/05/linux-botnet-malware-analysis-part-2.html
Part 3: http://www.boredhackerblog.info/2017/05/linux-botnet-malware-analysis-part-3.html

Monitoring:
Goal for monitoring was inspired by what MalwareTech has done in the past.
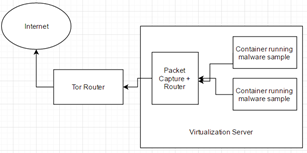
As I stated in the first part, I did want to monitor to see who got attacked by the botnet we were currently researching. While being connected to C2, we did not observe any attack commands being sent.
There are couple of ways you could monitor the specific botnet we were looking at. One way is to just have the client/bot connect to the C2 server and observe the network traffic to see who is getting attacks. In this case, you may want to reduce the network speed to not have large impact. This way is still bad. Another way is to use instrumentation and intercept the C2 commands and write them to file, then modify the command before it’s passed to the actual function that processes the commands. The last way I could think of was to just write a fake bot. This would involve writing something that behaves exactly like the client/bot but doesn’t do all the bad stuff.
In case of the malware we were analyzing, writing a fake bot was really easy to do due to the simplicity of C2 protocol. Below is the example of the fake bot the specific malware we’re analysing:
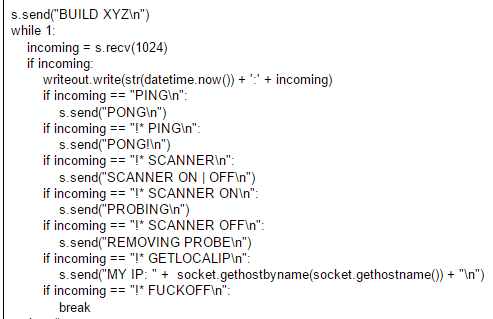
When the command from C2 is received, the bot takes timestamp and the command and writes it out into a file so we can keep track of what happened and when it happened.

Limitations and Improvements:
Limitations in this research mostly came from lack of time and lack of skills. We only ran the malware for less than a month and we were not able to observe any actual DDoS attacks.
To improve the research, we could next time monitor multiple botnets to observe actual attacks. We could analyze the malware in more detail as well.

Automation and future research:
When we first ran our honeypots we received a lot of different samples. For automation, we would have to automatically download the malware samples, extract C2 information, and connect to C2 server with fake bot to observe attacks.
For future research, we will try to focus on implementing automation and hopefully see attacks being launched in real time and find out who the victims are.

Conclusion:
This was an interesting semester project. We were able to set up honeypots and get some common malware samples, figure out how they spread and how their brute force algorithm works, we were also able to figure out some of the commands that could be sent to the bots for attacks, and write a monitoring tool.

Resources:


The resources for this project were provided by the Living Lab at IUPUI.

Monday, May 22, 2017

Linux botnet malware analysis: part 2

Part 1: http://www.boredhackerblog.info/2017/05/linux-botnet-malware-analysis-part-1.html
Part 2: http://www.boredhackerblog.info/2017/05/linux-botnet-malware-analysis-part-2.html
Part 3: http://www.boredhackerblog.info/2017/05/linux-botnet-malware-analysis-part-3.html

This post will probably have some technical mistakes due to lack of skillz. If you spot any, leave a comment.

Analysis:
Binary analysis in this case is analysis of executable binary file. Generally there are two types of analysis static and dynamic. Static can simply be defined as analysis without executing the file and dynamic is when file is executed.
Static analysis can include analyzing strings, binary properties, function usage/import, disassembly, and other file properties. Dynamic analysis can include analyzing the malware behavior while it’s running. Behavior such as resource usage, network communications, system changes, and etc. Dynamic analysis can also involve using a debugger or some tracing tools.


The sampled analyzed in this research is called “qbot” and the source code of it was released a while ago.


Static Analysis:
File type - In order to understand what’s being examined, file command can be used to identify file type. File utility uses magic headers and also parses file structure to determine what type of file a provided file is. For ELF files (Linux Executable) the file command can give information regarding whether the file is statically compiled or not, if the symbols are stripped or, and what architecture the file runs on.
Strings - Looking at strings often helps with the analysis. On Linux strings command can be used to examine printable characters. This command can sometimes identify function names, IP addresses, data that’s printed, and other information from the binary file.
Disassembly and decompilation - Source code is turned into binary using a compiler. When code is disassembled, you see what the compiler thought would be the best way to run the code on a system. The binary cannot be taken and turned into source code again. You can however use decompilation to basically get close to what the original source code logic would have looked like.
There are more static analysis tools that were not mentioned here but links to them is provided in Resources section.


My analysis started with downloading a shell script that was being downloaded to my honeypot. The shell script contained download commands to download more files. I downloaded these files and ran the file command on them. You can see the results below. (Ignore desktop.ini)
First thing you’ll notice is that they are ELF files obviously. You can see that the files are compiled for many different architectures. This increases the chances of the malware being more successful at spreading. The shell script executed all the files. If the file doesn’t fit the architecture, it will just fail to execute. Since it’s compiled for so many architectures, chances are, at least one of the file will execute.
Another thing to notice is that the files are statically linked. This means that the system its executing on does not need to have library the malware is using. Notice that the files are not stripped either. The symbols are still part of the program. I don’t know why this was done but the code is now open source anyway so it doesn’t really matter.


Above is the output from the strings tool. I censored out IPs and file names.
The shell command starting at cd and ending at rm -rf * is what was executed on my honeypot. With strings, you can also see (:-D) an IP and a PORT. That’s probably the C2 server but we’ll confirm after more analysis. You can also see a username and password list while running strings command. This is probably the list it uses to brute force machines before running the command in the screenshot above. The command basically downloads the shell scripts that needs to be ran, via various methods such as http, ftp, and tftp, then executes the scripts.
After looking at more output, you can see the full list of usernames and passwords.


Next I started using decompilers and disassemblers. The tools I used are Hopper, IDA, and RetDec.


Above is the screenshot of the code that’s executed first. There are multiple interesting functions being called. First one is printf with getBuild, getBuild function returns “DONGS” as seen below:
Prctl is also being called. Prctl function is used for interacting with processes. The sample changes process name to “/usr/sbin/dropbear.” getOurIP function gets the IP address of the machine its running on. After that’s done, fork is called to start a new process.
At this point, I switched to RetDec because the output from it was easier for me to understand.
Above, you can see the sample attempts to make a connection to C2 server. If the connection is successful, it sends BUILD DONGS to the C2 server.
PING/PONG messages are exchanged between C2 and the client.


After successful connection, the bot/client is ready to receive commands. We were running the sample in a container so we had some traffic to analyze. When we looked at the traffic, we saw that the commands being sent had !* in the front. First command sent was !* SCANNER ON, as soon as the bot connected.
In IDA, you can also analyze strings, in the screenshot below, you can see some of the commands and reply for some of the commands.


Back in Hopper, you can see decompiled functions for some of the commands.


When analyzing strings, we saw Linux command that downloaded and executed the malware, IP:PORT, and potential usernames and passwords. In IDA, we can confirm that.
Above you can see that commServer (IP:PORT) is being used in InitConnection.


And here’s the list of usernames and passwords the malware tries.


These lists are utilized in StartTheLelz function. This function is using them to brute force machines then executing infectline string (download and exec commands).


I had to stop here and start using dynamic analysis. Dynamic analysis for me is a lot easier.


Dynamic Analysis:
Tracing tools - Tracing tools such as strace and ltrace can be used to trace system or library calls being made.
Instrumentation - Instrumentation tools can be used to trace function calls by the sample you’re analysing. You can also use instrumentation tool to modify the arguments in these calls. Frida is one such tool.
LD_Preload - LD_Preload trick allows an analyst to load their own library which can trace function calls as well. You’re essentially intercepting calls and you can also modify return values. It doesn’t work when the sample you’re analyzing is statically compiled.
Debugger - It disassembles the code. While running the code, you can track what instructions are being called and monitor the execution flow. It also allows you to modify registry or data in memory to change behavior of the execution. You can also edit the instructions if you need to.


We can use dynamic analysis to validate some of our findings from static analysis. We can either connect to C2 while doing dynamic analysis and just watch what commands C2 sends and see what they do or we can set up our own C2 and interact with the malware that way. The sample being analyzed here has a very simple C2 protocol. In this case, I just had to change my IP address to the IP address of the C2 server and use netcat to listen on the same port as the C2 server. In VirtualBox, you can do this by having NIC attached to the VM but setting the NIC settings to be “Not attached”.
I used the command ‘ncat -lkvp 513’ the sample was using port 513 for C2.
-l is used to listen
-k is used to keep listening. After a client disconnects, ncat keeps running and listening.
-v is verbose mode. Ncat notifies us every time the client connects.
-p 513 is used to specify port 513.


First I use tracing to examine the behavior. Since the binary is statically compiled. Ltrace did not work. Strace does work. Strace is ran with -f option to follow forks. The command used is “strace -f ./bash” (note: bash just what the malicious file is named) below you can see the execution being traced and connection being made to C2 server, Build DONGS and PING are also sent.


In the ncat window, I tried different commands.
When sending SCANNER, the client responds with SCANNER ON | OFF.
Sending SCANNER ON results in the client responding with PROBING.
Sending SCANNER OFF results in the client responding with REMOVING PROBE.


While analyzing the traffic from running the actual malware in container and letting it connect to C2, we noticed that there was a lot of traffic on port 23. When SCANNER ON is sent to the bot, it starts trying to brute force login on port 23. I quickly started up another ncat window and this time, I started listening on port 23.
Here’s what I saw:
It does connect to port 23.


Next thing I tried was the HTTP command to do GET request flood. Below you can see the results of HTTP connection.
Notice that it does GET /. Also notice that it attaches Referer site in the GET request as well. It’s to make the request appear like the user is coming from Google search.


While doing more static analysis on SCANNER part, I discovered the algorithm for how it does brute force.
Notice that it does readUntil “ogin:”.
I also looked at other strings around “ogin:”. Above you can see ssword:, ncorrect and sh as well.
When connecting to servers on port 23, the malware looks for ogin, ssword, ncorrect, and sh. Original code is probably some what similar to this:
If ogin:
Send username
If ssword:
Send password
If sh:
Send infectline
If ncorrect:
Loop


In order to test this dynamically, I found some example code for python socket server online and modified it a bit.
Here’s the modified code:
I’m sending Login, Password, and Incorrect. This should get the malware to loop through the username and password list we discovered during static analysis.
I ran the python socket server and sent SCANNER ON to the client. I dumped all the output from Python into a text file. Note that the python server was getting connected from all the threads the malware spun up. The log file didn’t look so pretty. Below is the screenshot of attempted usernames and passwords:


That confirms part the algorithm written above. Now I needed a successful login from the malware so I can confirm that it does indeed send the infectline. I used netcat for this. I echoed all the necessary replies when the malware connected. In the screenshot below, you can see that the malware tried root/root then it sent the infectline.


After that was successful, the malware sample actually sent credentials and IP back to the C2 server.


FUCKOFF command kills the bot process.


So far we’ve learned:
  1. Bot spreads via brute force on port 23, using the built-in dictionary
  2. Brute force algorithm
  3. C2 protocol and commands
  4. Capabilities of the bot


I got all the information I need from the (half-assed) analysis for the next part of my project. In the next post, I’ll cover monitoring, limitations and improvements, automation and future research, and conclusion.


Resources:
https://www.virtualbox.org/

The resources for this project were provided by the Living Lab at IUPUI.

Thursday, May 18, 2017

Linux botnet malware analysis: part 1

I came across my first Linux botnet malware when I setup a honeypot at work. I started analyzing it and it was really interesting. After that I started focusing on other work. I always wanted to see if I could track DDoS attacks but I never had the chance to further the project. This year, I was taking a NetSec class and decided that I should investigate botnet as my final project.
The analysis done here is a bit amateurish/half-assed. I was limited by time and skills. My goal was to determine what botnet infrastructure looks like, how it spreads, its capabilities, C2 protocol, and how to monitor it.
I worked with another person to do this. The data collection lasted about a month and we spent just a few weeks on analysis.


Background:
DDoS attacks are very commonly covered in the media/news now more than ever. Attacks are usually launched from botnets and that’s one reason to study botnets. Besides that, botnets are just interesting.
There are two basic components of a botnet. Command and control server and the victim/client. C2 is responsible for giving commands to the victim/client to launch attacks or do other things. Botnet can use different communication protocols, such as HTTP, IRC, and raw TCP socket connection.
Another thing required by the botnet malware is the ability to spread and infect more machines. Infection can rely on exploits or brute force. From what I’ve noticed from running honeypot is that the malware brute forces port 23/22 and runs a command, which downloads the sample malware and executes it.


I’ve seen download being done with curl, wget, ftp, and tftp.
In this research, we set up honeypots, acquired malware samples, and did analysis.


Honeypot Setup:
We utilized Modern Honey Network (MHN)  by ThreatStream for deploying and monitoring honeypots. MHN basically runs a central server that receives information from honeypot sensors. You can analyze what passwords were tried, where the attacks came from, and etc using it.
We were interested in anything that brute forces SSH so we deployed Kippo honeypots using MHN. Our original idea was to analyze bunch of samples/families so we deployed 7 honeypots but as soon as we started organizing the data, we realized that this would be too much so we decided to just focus on one family of malware and one group of samples.
Kippo saved logs of what commands were executed on the honeypots so we wrote a script to download those logs using sshpass (Kippo runs on port 22 and by default SSH was moved to port 2222 by MHN script):
sshpass -p ‘PASSWORD’ scp -r -P 2222 -o StrictHostKeyChecking=no -o UserKnownHostsFile=/dev/null root@HP_IP_ADDRESS:/opt/kippo/log/* /root/logs/
After we obtained the logs we started looking through them. Since we were looking for command execution, we filtered the logs by looking for the word “executing command”. Now that we have list of commands executed, we noticed that some commands were irrelevant and we wanted lines in which download and execution occurred. We filtered again by looking for wget, curl, and ftp.
We can use the output from this and download the samples for analysis.


Various VPS providers were used to deploy these honeypots. Vultr was used to run MHN. Vultr is cheap, reliable, and user friendly.


Analysis Infrastructure setup:
Static and dynamic analysis will be covered in the next post.
For our research, we wanted to capture network some data to see who the victims of DDoS attacks are and information regarding the C2 protocol. We thought we would run the malware and then just filter for information using tshark.
Our goals when running the malware were that we wanted to capture the network traffic, avoid doing having a lot of impact when DDoS attacks were launched, and anonymize our IP address.
We utilized Proxmox, Tor router, Pfsense, and Linux containers.
In the picture above you can see the layout visualized. Proxmox allowed us to create containers and we created ubuntu containers. Traffic from the container is sent to pfsense, where we can do packet capture before the traffic goes to tor.
Proxmox containers have unique IP addresses assigned by pfsense so we can run multiple samples and filter by IP address to find out what sample is generating the specific traffic. Another benefit of proxmox is that it allows us to limit the network speed for the container. This allows us to avoid making a big impact in DDoS attacks but still monitor C2 commands.
Finally, the tor router we used was a physical one. Apparently, the latest version of pfsense does not have the tor package. This is okay. The router we used had a physical switch. When it’s switched to tor mode, nobody can access the configuration panel. To disable tor, you would literally have to be physically present and flip the switch.  


In the next post, I’ll cover binary analysis of the sample we decided to analyze.


Resources:
http://www.vultr.com/?ref=7127410 (FYI: this is an affiliate link, if you sign up using it, it puts credit in my Vultr account. You don’t have to sign up using it or even use Vultr if you find a better provider)

The resources for this project were provided by the Living Lab at IUPUI.

Tuesday, May 2, 2017

Forensics - TeamViewer file extraction

Introduction:
I was a TA in a forensics class during Spring. I created an extra-credit assignment for the class. The assignment is below:


I selected TeamViewer because I didn't see any tool to recover this file type.

The goal was to make students figure out the file structure for TeamViewer recording files, figure out what data to extract, and learn/apply programming skills.

Solution:
First thing to do is to discover what Teamviewer file format is like.
I downloaded some TVS files from the internet. Alternatively, you can create a teamviewer session and record it, then save it as well.

I opened them in a hex editor. 
Both files begin with TVS as header then there is some metadata then there is BEGIN. Metadata is information about the recording.
So our format so far is TVS (METADATA) BEGIN.

Both files have END and base64 string at the bottom. When carving automatically, it’s hard to figure out when the base64 string ends. It’s much easier to just look for TVS header and END footer. 

To see if I can open file that does NOT contain base64 after END, I modified the file and removed base64.

I saved the file as nobase64.tvs.

And opening and playing the modified file does work!

So information we have to look for and extract:
TVS (header) | metadata | BEGIN | DATA | END (footer)

I created a fake image by just dumping urandom + tvs file + urandom into one file. 


In python, I can open and read file in binary mode and start looking for hex data.
So now, I have to go through 0 to 361286618 and look for TVS, BEGIN, and END.
ASCII to HEX:
TVS = 54 56 53
BEGIN = 42 45 47 49 4e
END = 45 4e 44
We can look for TVS but we might see some false positives.


Instead we want to look for TVS 0x0d 0x0a.
Same with BEGIN
And END

Algorithm:
For EACH_BYTE in TOTAL_BYTES:
Look for HEADER:
Note address of the header
Look for BEGIN:
Note address of begin
Look for FOOTER:
Note address of footer
Extract HEADER to FOOTER & metadata between HEADER and BEGIN.

Implemented in Python:

disk_image = open('myimage','rb').read()
file_number = 1
for i in range(0, len(disk_image)):
   if (disk_image[i] == 'T') and (disk_image[i+1] == 'V') and (disk_image[i+2] == 'S') and (disk_image[i+3] == '\x0d') and (disk_image[i+4] == '\x0a'):
       header = i
       if (disk_image[i] == 'B') and (disk_image[i+1] == 'E') and (disk_image[i+2] == 'G') and (disk_image[i+3] == 'I') and (disk_image[i+3] == 'N') and (disk_image[i+4] == '\x0d') and (disk_image[i+5] == '\x0a') and (disk_image == 'K'):
           begin = i
           if (disk_image[i] == 'E') and (disk_image[i+1] == 'N') and (disk_image[i+2] == 'D') and (disk_image[i+3] == '\0d') and (disk_image[i+4] == '\0a'):
               footer = i+2
               outfile = open(str(file_number)+'.tvs', 'wb')
               outfile.write(disk_image[header:footer])
               outfile.close()
       file_number = file_number + 1


The implementation above uses tons of memory.
Using the script above would be inefficient. Regex library in python can be used to make this easier and more efficient.

Headers, begin, and footer are defined. Addresses for header, begin, and footer are extracted. TVS file is extracted and written. Metadata is extracted and written. CPU and Memory usage is low this time and extraction speed is much faster.

File is uncorrupted and plays with Teamviewer.

That's all. Hopefully that was useful to someone. I'll put the script on https://github.com/ITLivLab/TVS_extractor

Formatting is messed up because copying and pasting doesn't exactly work great between Word, Google Docs, and Blogger.