Introduction
I needed a pentesting lab for students. In this post, I’ll discuss several designs and pros and cons of those designs. In the next post, I’ll cover how to do the actual setup for one of the designs.
This isn’t just for pentesting. I’m sure with some modification, you can apply this to DFIR and networking related labs.
Students are taking security classes remotely/online and on-campus. If the students are on campus, they have access to lab machines. Remote students are responsible for their own set up. We can divide the lab designs into remote and local.
These are our options for local:
- Each lab machine has a pentesting environment.
- Students share target machines but run attacker VM on the lab machines
These are the options for remote:
- All the students SSH into one machine and share targets or have their own targets
- Students VNC into attacker VM and share targets or have their own targets
- Students VPN into pentest network and share targets or have their own targets
Local
1.)
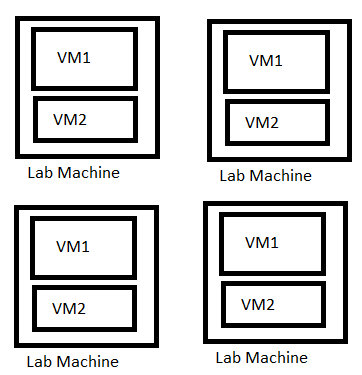
Currently, we’re using a setup where each lab machine has two or more VM’s. This generally works fine.
Currently, we’re using a setup where each lab machine has two or more VM’s. This generally works fine.
Pros:
- No one point of failure.
- If VM’s aren’t working correctly on one workstation, the student just moves to another one.
- Easy to troubleshoot
- Generally works
Cons:
- Limited resources
- We run out of RAM quickly. The VM’s can be slow at times too.
- Less targets
- We can’t really run more than two VM’s at the same time. This limits simulation of real business environment.
- There is no pivoting since only one target VM is running.
2.)
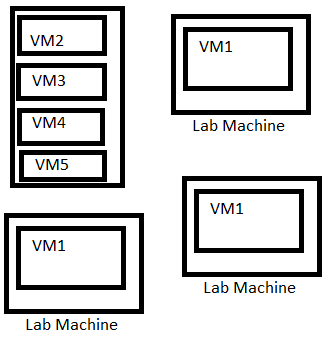
We’ve also tried another option where we ran target VM’s on a Proxmox server connected to the lab network. This allows students to run one attacker VM then attack multiple targets on the lab network. This was very easy to setup.
We’ve also tried another option where we ran target VM’s on a Proxmox server connected to the lab network. This allows students to run one attacker VM then attack multiple targets on the lab network. This was very easy to setup.
Pros:
- Generally works
- Multiple different targets
- Easy to manage and troubleshoot
Cons:
- Single point of failure.
- If Proxmox machine goes down (it hasn’t happened before) they can’t do their assignments
- We did an exercise where students were learning to use nmap and OpenVAS. They also were provided a range to scan and the targets were set up on Proxmox. It slowed down the scanning since everyone was hitting the targets at the same time. (The design wasn’t very thought out by me so I didn’t see this issue coming)
- Limited resources
- Depending on how you set this up, you may have limited resources.
- For example, if you have multiple virtualization hosts, you should be fine. If you’re just relying on one, you will have to share targets.
- Issues with sharing targets
- You will have to set up scheduled reboots for the target VM’s. If a service crashes for a target VM, rest of the students won’t be able to do their assignment.
Remote
Problem with having a local pentest lab is that students have to be there during class time to do their assignment. Slow students have to either stay after or come in on some other day to do their assignment. Also, the teacher takes us much of the time lecturing. We thought it would be best to set up a remote lab for everyone. Some students may want to either hack or do their assignment at 3 AM in the morning. Obviously, they can’t be at school so remote lab was discussed.
3.)
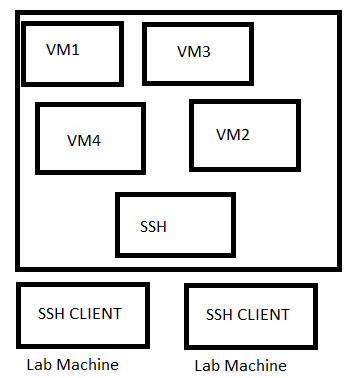
I did SANS NetWars: Core Continuous (https://www.sans.org/netwars/continuous) few months ago. Their lab required you to SSH into a server and do your attacks through that. Of course, you had to utilize SSH tunneling as well for some of the attacks. I am pretty sure the targets were shared too.
I did SANS NetWars: Core Continuous (https://www.sans.org/netwars/continuous) few months ago. Their lab required you to SSH into a server and do your attacks through that. Of course, you had to utilize SSH tunneling as well for some of the attacks. I am pretty sure the targets were shared too.
Pros:
- Easy for students who are familiar with command line tools
- Requires low amount of resources
- One powerful machine with SSH should be fine
- Targets are shared.
- Easy to manage and troubleshoot
- Adding new tools and removing and adding users is easy.
Cons:
- Not for the students who are still struggling with command line
- Sharing targets
- You have to setup scheduled reboots for the target VM’s.
- You have to focus on keeping the shared SSH server secure.
- You don’t want students to pwn the machine they’re sharing with other students.
- Although, you can give them extra credit if they are able to do that. They probably deserve it.
- Single point of failure
- If SSH server goes down, your students can do hacking or assignment.
4.)
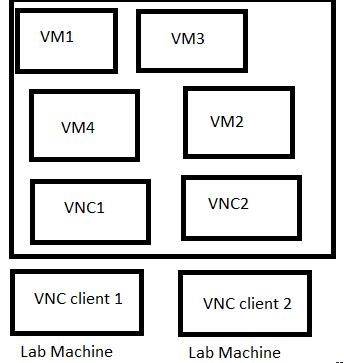
VNC access is another way you can do a pentesting lab. In this design, the students VNC into their VM. They can conduct whatever attacks from the VM. Also, the VM does not run a VNC server. The VNC server is on the host machine. QEMU/KVM allows you to do this.
VNC access is another way you can do a pentesting lab. In this design, the students VNC into their VM. They can conduct whatever attacks from the VM. Also, the VM does not run a VNC server. The VNC server is on the host machine. QEMU/KVM allows you to do this.
Pros:
- Isolated
- Depending on how you set this up.
- Easy to manage and troubleshoot
- Depending on how your scripts are written, this should easy to manage and troubleshoot.
- You can run VM’s so any changes that are made are not saved to disk.
- You can also utilize linked QCOW images to make it easier to manage changes
- Multiple targets
- You can assign VM’s to each student and have multiple shared targets
- High customizability
- You can customize VM’s before you let students access them
- Low resource usage (not exactly)
- If you’re using QEMU/KVM, you can enable KSM (https://en.wikipedia.org/wiki/Kernel_same-page_merging)
- With QEMU/KVM, you can use one qcow image and deploy multiple VM’s
Cons:
- Resource intensive
- You’re running VM’s for each student
- Depending on the amount of VM’s and students, you will use high bandwidth, RAM, and CPU
- No copy and paste
- Students won’t be able to copy and paste stuff.
- Sharing targets
- Again, depending on the setup, you might end up sharing targets.
- You will also need to reboot the targets because they’ll probably crash at some point
- Single point of failure
- If the server goes down, you pretty much lose everything (if you’re running in a mode where no changes are saved to disk)
- If the network goes down or slows down because of VNC traffic, it causes issues for all of the students
5.)

VPN connection is another way to set up a lab. This is what Offensive Security uses. Students have their own VM’s but they can VPN into the pentesting lab and attack the machines. I had this set up with ESXi. When students VPN into the lab, they cannot access internet through the VPN. They’re limited to communicating whatever IP range they’re assigned.
VPN connection is another way to set up a lab. This is what Offensive Security uses. Students have their own VM’s but they can VPN into the pentesting lab and attack the machines. I had this set up with ESXi. When students VPN into the lab, they cannot access internet through the VPN. They’re limited to communicating whatever IP range they’re assigned.
Pros:
- Easy to manage and troubleshoot
- Adding and removing users should be easy
- Multiple different targets
- Low resource usage
- You don’t have to host attacker VM’s.
- Isolated
- Somewhat. Depends on how the network rules are set up.
- Customization
- Students can customize their machines. They can also download whatever new tools they need.
Cons:
- Single point of failure
- VPN server or ESXi goes down and your students can do anything.
- Sharing targets
- You’ll probably have to share targets between students.
- You’ll probably need to reboot the targets. They’ll probably crash at some point
Of course, pros and cons will change a bit depending on exactly how you set things up and what resources you have. For example, If you have bunch of high-end servers, you probably won’t be concerned with RAM and CPU usage.
In the next post, I’ll discuss how I set up pentesting lab with VPN. After that, I’ll discuss setting up lab with VNC.
If you have ideas or corrections. Leave them in the comments. This post obviously doesn’t mention all of the designs that you can have.
(The diagrams are terrible. I know.)